Built-In vs Freestanding Wine Coolers: Which One Do You Need?
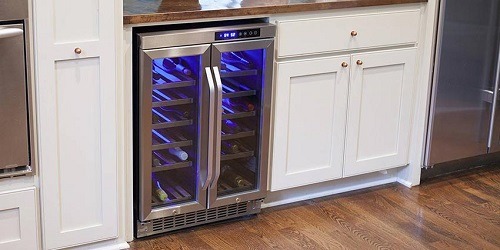
The difference between a built-in and a freestanding wine cooler comes down to where the unit gets rid of its heat. A built-in model vents out the front, so it can sit flush inside cabinetry. A freestanding model vents out the back or sides, so it needs open air around it. If you want the cooler tucked under a counter, you need a front-venting unit. If it will stand on its own, either type works.
Front-venting vs rear-venting
Every wine cooler pulls heat out of the cabinet and releases it into the room. Where that heat leaves is what separates the two designs.
Front-venting (built-in or under-counter) models have a grille at the bottom front, often called the kick plate or toe grille. A fan draws room air in through part of the grille, passes it over the condenser and pushes the warm air back out the front. Because nothing needs to escape from the back or sides, the unit can be boxed in by cabinets on three sides and a countertop above.
Rear-venting (freestanding) models release heat through coils or vents on the back, and sometimes the sides. They depend on air circulating freely around the cabinet. Countertop units and most thermoelectric coolers fall into this group. Thermoelectric cooling in particular needs plenty of airflow, which is one reason you rarely see it in a true built-in. Thermoelectric vs compressor wine coolers covers that difference in more detail.
A front-venting unit can usually be used freestanding as well. The reverse is not true.
Why a freestanding unit fails inside a cabinet
It is tempting to buy a cheaper freestanding cooler and slide it into a gap in the cabinets. The problem is that the hot air it pushes out the back has nowhere to go. It collects behind and around the unit, so the cooler is now trying to shed heat into a pocket of air that keeps getting warmer.
The usual results:
- The cooling system runs much longer than designed, sometimes nearly nonstop.
- The inside temperature creeps up, especially in warm months.
- Parts wear out sooner, and the unit may fail early.
- Some manufacturers state in the manual that installing a freestanding model in an enclosed space can void the warranty.
If you already have a freestanding cooler in an enclosed spot and it struggles to stay cold, this is the first thing to fix. See wine cooler not cooling for the rest of the checklist.
Clearance: check the manual for exact inches
Clearance requirements vary by model, so treat the manual or installation guide as the final word.
As a general pattern, freestanding units call for a few inches of open space behind them and some space on the sides and top. Built-in units are designed for a much tighter fit, but most still ask for a small gap around the cabinet so the unit can slide in and the door can open without rubbing. The front grille on a built-in must stay completely unobstructed. Do not cover it with trim, a rug or a decorative panel that is not made for that model.
Look for the clearance figures before you buy, not after. If a freestanding unit needs space you do not have, it is the wrong unit for that spot.
Measuring the opening
Standard under-counter openings in US kitchens are sized around a countertop height of roughly 36 inches, which usually leaves an opening a little over 34 inches tall. Common under-counter cooler widths include about 15, 18 and 24 inches. Your kitchen may not match the standard, so measure:
- Width: measure at the top, middle and bottom of the opening. Use the smallest number.
- Height: measure from the floor to the underside of the countertop at the front and the back. Floors are often uneven. Most under-counter units have adjustable leveling legs, but they only adjust so far.
- Depth: measure from the front edge of the cabinet face to the back wall. Remember the power cord and plug. Many installers place the outlet in a neighboring cabinet so the plug does not stop the cooler from sliding all the way back.
Compare your numbers with the cut-out dimensions in the installation guide, not just the outside dimensions of the unit. The cut-out figure already allows for the fit the manufacturer expects.
Door swing and handles
Doors cause more surprise problems than width. Check three things:
- Hinge side. Many coolers have reversible doors, but not all. Pick the side that opens toward where you will be standing.
- Clearance next to a wall. If the cooler sits at the end of a run of cabinets against a wall, the door and handle may need extra room to swing open far enough to pull shelves out. Some built-in models use a zero-clearance hinge designed for tight spots; the spec sheet will say.
- Handle depth. Built-ins usually sit close to flush with the cabinets, but the handle sticks out. Make sure it will not hit a nearby island, drawer pull or dishwasher door.
Cost differences
For the same bottle capacity, built-in models generally cost more than freestanding ones. The front-venting design and fan system add to the price, and many are made with a finished stainless or glass door meant to match other kitchen appliances. If the opening needs trimming, shimming or a new outlet, installation adds more.
Freestanding coolers cost less and are simpler to move, which makes them a good fit for renters, a dining room or a basement where there is space around the unit. If you are unsure how many bottles you need, read wine cooler bottle capacity first, because advertised capacities are based on standard-size bottles and often overstate what fits in practice.
One last tip: if there is any chance you will move the cooler into cabinetry later, buy a front-venting model now. It works in the open today and in the cabinet tomorrow, while a rear-venting unit only ever works in the open.